-
Notifications
You must be signed in to change notification settings - Fork 24
Adding OAuth
[Work in progress...]
This topic explains how to add OAuth 2.0 security to your Apigee-127 API using Volos.js configurations placed in the API's Swagger specification file.
- Examples and code samples
- About Volos.js support for OAuth 2.0
- Overview of steps
See how to add OAuth 2.0 security to the "quick start" API with Apigee as the token manager. See Quick Start: Add Apigee OAuth 2.0 to the API for an end-to-end, working example.
The weather-advanced sample project on GitHub shows how to add OAuth 2.0 to an API using Apigee Edge as the token manager.
The example-project sample on GitHub demonstrates how to use the Volos.js API to create and manage OAuth tokens programmatically.
You can find an examplehere that shows how to configure OAuth 2.0 using Redis as the store for token management.
OAuth 2.0 is provided to Apigee-127 through the Volos.js project. Volos.js supports two Node.js implementations for adding OAuth 2.0 security to an API:
-
volos-oauth-redis: Uses Redis as a database for managing OAuth tokens and related activities.
-
volos-oauth-apigee: Communicates with Apigee Edge through APIs for managing OAuth tokens and related activities.
In this topic, we'll discuss using Apigee Edge as the token manager. Where appropriate, we'll point out how to perform comparable steps using Redis.
See Quick Start: Add Apigee OAuth 2.0 to the API for an end-to-end, working example.
For another example, see the weather-advanced sample project on GitHub.
If you want to use password credentials, you need a way to validate user credentials before retrieving an access token from Apigee. Here's how:
- Add the
passwordCheckstanza in the Swagger spec in the oauth2 options section. It specifies in which "helper" file the app can find the passwordCheck() method. In this case, it looks inapi/helpers/volos.js. The uncommented stanza should look like this:
   passwordCheck:
          helper: volos
function: passwordCheck- Implement the
passwordCheckfunction inapi/helpers/volos.js.
The sample code below simply satisfies the requirement of having a passwordCheck() method. You can copy and paste it into api/helpers/volos.js.
Note: In reality, you might implement this method to verify the user's credentials in an LDAP system, for example.
module.exports.passwordCheck = passwordCheck;

function passwordCheck(username, password, cb) {
  // Implement as necessary
  var passwordOk = (username === 'scott' && password === 'apigee');
  cb(null, passwordOk);
}- Start the app (
a127 project start). - Obtain the access token by calling this API (with the default values specified in volos.js for username and password). You have to obtain the client_id and client_secret values
curl -X POST "http://localhost:10010/accesstoken" -d "grant_type=password&client_id=o2lxnymzY9iDkjXNgGtb9PsNJCZNJXVP&client_secret=S9vYUARVkADrDvc1&password=apigee&username=scott"
You can find a working example where the Access token is fetched from Apigee Edge programmatically using Volos.js. The relevant code is in app.js in the example-project on GitHub.
###Obtaining consumer keys directly from Apigee Edge
Here is the procedure:
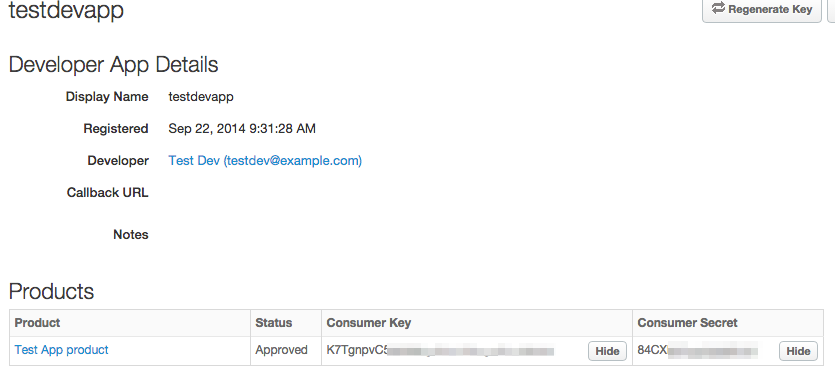
You need to create a Developer App on Apigee Edge, then, you can obtain the keys from at App.
- Create a new Product. (Publish > Product and fill in the form. You do not have to select an API proxy for this exersize.)
- Create a new Developer. (Publish > Developer and fill out the form).
- Create a new Developer App. (Publish > Developer App and fill out the form, and click Save)
- Open the Developer App you just created. Click Show next to the Consumer Key and Consumer Secret fields.

- Substitute these values for the
client_idandclient_secretitems in the/accesstokenAPI call. - Execute the above curl command with the substituted values. Here's an example (piped to a Python utility that prints JSON in a nice, indented format):
  curl -X POST "http://localhost:10010/accesstoken" -d "grant_type=client_credentials&client_id=o2lxnymzY9iDkjXNgGtb9PsNJCZNJXVP&client_secret=S9vYUARVkADrDvc1" | python -m json.tool
  {
      "access_token": "7zSVVqNCsGYQKWDKy2C02XGOTUBA",
      "api_product_list": "[Test App product]",
      "api_profile_name": null,
      "application_name": "921c456d-77c0-4b31-9814-c1f7d4c47b8f",
      "client_id": "o2lxnymzY9iDkjXNgGtb9PsNJCZNJXVP",
      "developer_email": "[email protected]",
      "expires_in": 1799,
      "issued_at": 1411398701495,
      "organization_id": "0",
      "organization_name": "wwitman",
      "refresh_count": 0,
      "refresh_token": null,
      "refresh_token_expires_in": 0,
      "refresh_token_status": null,
      "scope": "",
      "state": null,
      "status": "approved",
      "token_type": "bearer"
  }
Now, you have an access token and you can execute the API by calling it like this:
curl -i "http://localhost:10010/hello?name=Scott" -H "Authorization: Bearer 7zSVVqNCsGYQKWDKy2C02XGOTUBA"
Having Trouble? Try posting your question to the Apigee Community. Or, for more links and resources, check out our Help Page
| Need help? Visit the Apigee Community ! |
|---|
-
Getting started
-
Add policies to your API
-
Add security policies
-
Deploy your projects
-
Programmatic hooks
-
Good to know about
-
Deep dives
-
Reference topics
-
Troubleshooting and getting help
-
Related resources