Example Project
This example gets you up and running quickly with a sample Apigee 127 project that proxies the Twitter search API.
- Installation
- Project setup
- Configure and run the app
- About the app
- Troubleshooting
-
Clone the example project from GitHub:
git clone https://github.com/apigee-127/example-project.git -
In the
example-projectfolder, execute:npm install. -
Install Apigee 127:
npm install -g apigee-127The
-goption automatically places thea127executable commands in you PATH. If you do not use-g, then you need to add theapigee-127/bindirectory to your PATH manually. You may need to usesudoto execute this command.
To run the example project, you need to set up these things first:
-
Create a Twitter app. Any dummy app will do. You'll need to grab the Access Token and Access Token Secret keys from the app later. If you use keys from an existing app, be sure they are not expired.
-
If you don't have one, create an Apigee Edge account.
-
Deploy the
apigee-remote-proxyto Apigee Edge. Let's walk through the steps:-
Create an Apigee 127 account to hold your Apigee account information. Enter this command and follow the prompts, entering information about your Apigee account:
a127 account create <anAccountName>For example:
 $ a127 account create myApigeeAccount

     [?] Provider? apigee
     [?] Do you have an account? Yes
     [?] Base URI? https://api.enterprise.apigee.com  //-- Enter to accept the default.
     [?] Organization? wwitman
     [?] User Id? [email protected]
     [?] Password? *********
     [?] Environment? test
     [?] Virtual Hosts? default,secure  //-- Enter to accept the default
Note: If you already have an existing account, and create a new one, then you can switch to the new account by executing
a127 account select <account-name>.Note: TBD -- cross reference to account management section.
-
Deploy the proxy:
a127 account deployApigeeProxy myApigeeAccountDeploying proxy to wwitman Deployment name: apigee-remote-proxy environment: test revision: 1 state: deployed basePath: / uris: - "http://wwitman-test.apigee.net/apigee-remote-proxy" - "https://wwitman-test.apigee.net/apigee-remote-proxy"
-
###What is the apigee-remote-proxy?
This Apigee Edge proxy allows your local Volos.js components to talk to Apigee Edge through the Edge management API. To be used by Volos.js, the proxy must be deployed to Edge. The proxy is installed with Apigee 127, and lives in the apigee-127/node_modules/Volos/proxy directory.
-
In the
example-project, copyconfig/secrets.sample.jstoconfig/secrets.js. -
Edit
config/secrets.jswith your Twitter API keys and Access Tokens. You can find them on the management console for your Twitter app, under the API Keys tab.exports.twitter = { consumer_key: '123xxxxxxxxxxxxxxxx', consumer_secret: '456yyyyyyyyyyyyyyyy', access_token: '789aaaaaaaaaaaaaaaa', access_token_secret: '123bbbbbbbbbbbbbbbb' }; -
In the same file, edit the Apigee Edge object with your Edge account information. Leave the
uri,key, andsecretattributes blank.exports.apigee = { organization: 'jdoe', uri: '', key: '', secret: '', user: '[email protected]', password: 'mypassword' }; -
(Optional) Edit the file
config/index.jsand change the default values for thedevRequestandappRequestobjects:exports.devRequest = { firstName: 'Some', lastName: 'Person', email: '[email protected]', userName: '[email protected]' }; exports.appRequest = { name: 'Test App' }; -
Execute:
node bin/create-app.js. This uses thevolos-management-apigeemodule to provision a user, a developer app, and a product for you on Apigee Edge. Later, you'll call the Twitter search API with an access token created on behalf of this developer.You'll get a response like this:
 $ node bin/create-app.js
    Creating developer <Name of developer in index.js>
    Creating application Test App for developer <Name of developer in index.js>
   { id: 'xxxx-yyyy-aaaa-bbbb-cccc',
   name: '<Name of App in index.js>',
   status: 'approved',
   developerId: 'xxxxxxx',
   callbackUrl: undefined,
   scopes: [ '' ],
   attributes: {},
   credentials:
    [ { key: '123abc',
        secret: '456def',
        status: 'approved' } ] }
  $
Problem? Make sure the Apigee credentials you entered in
secrets.jsare correct.Note: You can go to the Edge management UI to verify that the user, product, and developer app were all created. Look under the Publish menu.
-
Execute these a127 account commands to add values to your account for the deployed
apigee-remote-proxy:-
a127 account setValue apigeeProxyKey CONSUMERKEY -
a127 account setValue apigeeProxyUri PROXYURIwhere:
-
CONSUMERKEY is the Consumer Key for the developer app that was created on Apigee Edge when you ran create-app.js. The value is the "key" that was returned as follows:
{ key: '123abc', secret: '456def', status: 'approved' } -
PROXYURI is
https://ORG-ENV.apigee.net/apigee-remote-proxy, whereORGis your organization name on Apigee Edge, andENVis the environment where the proxy is deployed. For example:https://jdoe-test.apigee.net/apigee-remote-proxy
-
Note: These credentials allow the app to call the
volos-remote-proxyto obtain an access token on behalf of the user through the Edge management OAuth 2.0 API.Problem? Make sure that the currently active account is the one you added the Consumer Key and Proxy URI to. You can check by doing:
a127 account listto see the list of accounts (the one with a "+" is the currently active one). Then, you can double-check the values in the active account by doing:a127 account show <account_name>. -
-
Execute:
a127 project start. -
Try the example curl commands that are printed to the console (from another console window):
Twitter Search: This command calls the Twitter search API through the Apigee 127 proxy, running locally on your machine. The OAuth Bearer token was generated through Volos and added to this curl command by the app:
``curl -H "Authorization: Bearer 123ababababababa" "http://localhost:10010/twitter?search=apigee"``Get a Password Token: This command returns a new access token on behalf of the user. You can try substituting this access token in the Twitter search API call.
``curl -X POST "http://localhost:10010/accesstoken" -d "grant_type=password&client_id=xxxxxxxxxxxxx&client_secret=yyyyyyyyyy&username=jdoe&password=password"``
This example application implements an API proxy for the Twitter search API. A Node.js server running on your local system communicates with Apigee Edge through the volos Node.js module's management API.
Volos is an open source Node.js solution for developing and deploying production-level APIs. Volos provides a way to leverage common features such as OAuth 2.0, Caching, and Quota Management into your APIs. Volos can proxy support for these features through Apigee Edge, or independently of Edge.
This example runs locally and makes calls to Apigee Edge to handle OAuth requests. Volos provides the glue that binds together your API implementation and Apigee Edge.
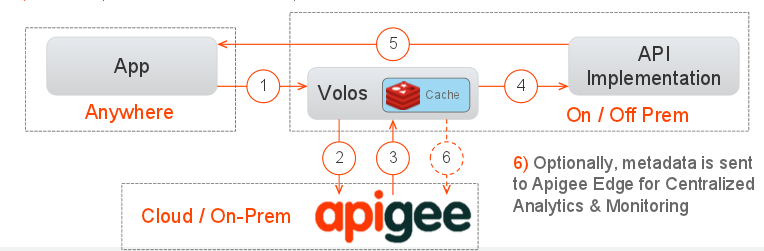
- The app makes an API call and the endpoint is the Apigee agent (Volos).
- Volos calls Apigee Edge to perform OAuth, Quota, or Caching. Volos only sends metadata to Edge, not the API payload.
- Edge returns a response indicating whether to allow the API call.
- If allowed, the API call is proxied to the Node.js API implementation.
- The API response is returned from the API implementation.
- (Optional) Metadata is sent to Edge for centralized analytics and monitoring.
- A possible source of error is using incorrect or expired app keys in your configuration. Make sure, for example, that your Twitter credentials are current.